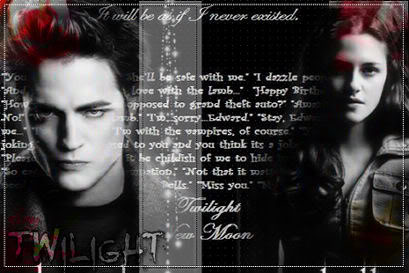
This tutorial was written by me on November 8th 2009
You will need:
at least 4 images all matching
mine supplied for the Twilight tag I am making
pentacom dot
My Supplies here
open up a new transparent image 600 x 400
to make a blend tag the first thing we need to do is prepare the images for this.
open 'Twilight1' in psp, image > resize > 80% and right click in your layer pallete, choose promote background layer
(the image must be a raster layer to be able to blend it).
select your freehand selection tool with the following settings: point to point, replace, feather 40
outline around Edward.
selections > invert and hit delete on your keyboard, this will delete alot of the background, each time you hit delete you will delete a bit more, press delete til you are happy with it.
I hit delete twice
** you can also save this as a psp tube and use it as a tube if you wish. **
copy and paste twilight1 onto your canvas and place towards the left ( see mine for placement )
open 'Twilight2'
draw around Bella > selections > invert and hit delete once
copy and paste this onto your canvas and place towards the right hand side
( see mine for placement )
activate the bottom layer and selections > select all
open the 'newmoon' and copy and paste into selection
select none
add a new layer above the new moon layer and flood fill with black
effects > plug ins > pentacom dots
with these settings: 255, 11, 255, 255, 255
lower the opacity to around 25
set both colours to white and select your preshape tool set to rectangle
draw a rectangle going vertical ( see mine )
convert to raster and send this layer to the top
make your background black and fill null, click on your preshape tool again
set the line style to dots and width 1.0
draw a rectangle in the white one.
merge these 2 layers together and lower the opacity to around 36
change the black to white in your colour pallete
and using the same settings as before draw a rectangle just around the outside edge
activate the edward layer and change the blend mode to luminance legacy
repeat this with the bella layer
open up the sparkles png and paste as a new layer on top, and place inside the white rectangle
open up the font and change background to black, fill to white
activate your text tool with these settings:
create as vector, width 1.0, size 72
type the your text and place towards the bottom left, size it how to like and convert to raster
add a drop shadow settings: 2, 2, 76, 5.0, black
change the blend mode to soft light
image > resize 85%
and save as a .jpeg
If you have any questions or comments on this tutorial, please leave me a message in my chat box.


No comments:
Post a Comment