

(CLICK IMAGE FOR FULL SIZE)
THIS TUTORIAL WAS WRITTEN BY ME ON JULY 16TH 2017
IT ASSUMES YOU HAVE WORKING KNOWLEDGE OF PSP AND ANIMATION SHOP
ANY RESEMBLANCE TO ANY OTHER TUTORIAL IS PURELY COINCIDENTAL
THIS WAS MADE USING VERSION 9 OF PSP BUT CAN BE DONE IN OTHERS
YOU WILL NEED:
TUBE OF CHOICE - I AM USING THE WORK OF VERYMANY AND YOU WILL NEED A LICENCE TO USE FROM HERE
TEMPLATE 64 BY RACHEL HERE
HAPPY BIRTHDAY KIT BY BITZY BEE HERE
BIRTHDAY ANIMATIONS BY SIMONE HERE
EYE CANDY 4000 - GRADIENT GLOW
ON TO THE TUTORIAL:
OPEN TEMPLATE - DUPLICATE AND CLOSE ORIGINAL
DELETE RASTER 1
CLICK ON LAYER 2
SELECTIONS - SELECT ALL - SELECTIONS - FLOAT - SELECTIONS - DEFLOAT - DELETE
OPEN PAPER 1 - SELECTIONS - INVERT - DELETE
REPEAT WITH LAYER 3 USING SAME PAPER
CLICK ON LAYER 1
SELECTIONS - SELECT ALL - SELECTIONS - FLOAT - SELECTIONS - DEFLOAT - DELETE
OPEN PAPER 9 - SELECTIONS - INVERT - DELETE
CLICK ON LAYER 5
SELECTIONS - SELECT ALL - SELECTIONS - FLOAT - SELECTIONS - DEFLOAT - DELETE
OPEN PAPER 20 - SELECTIONS - INVERT - DELETE
CLICK ON LAYER 7
SELECTIONS - SELECT ALL - SELECTIONS - FLOAT - SELECTIONS - DEFLOAT - DELETE
OPEN PAPER 4 - SELECTIONS - INVERT - DELETE
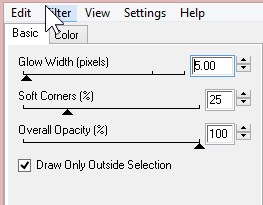
CLICK ON EACH OF THESE LAYERS AND ADD THE FOLLOWING GRADIENT GLOW
WITH BLACK
CLICK ON LAYER 8 AND ADD NOISE

DELETE LAYER 4 AND 6
MERGE LAYER 8 AND 9 TOGETHER - ADD DROP SHADOW AND MOVE TO TOP
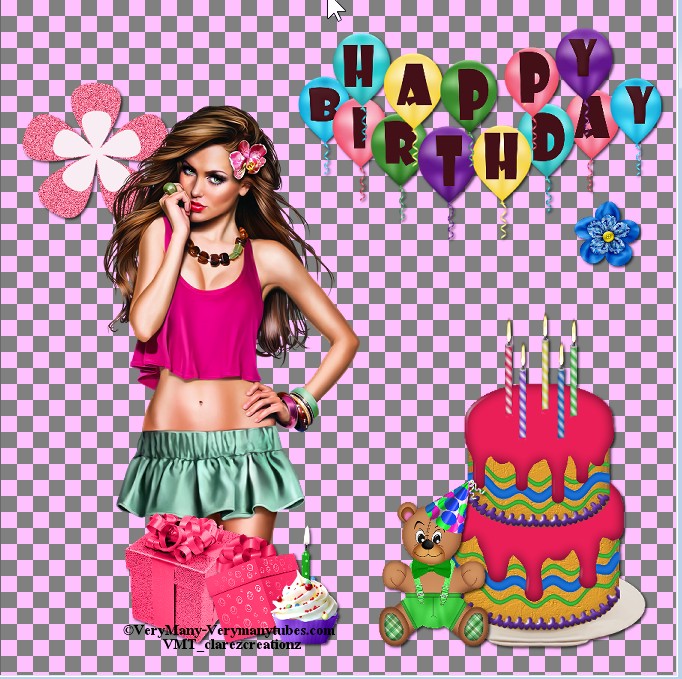
OPEN TUBE AND PASTE AS A NEW LAYER - DROP SHADOW
OPEN GIFT 7 AND PASTE AS A NEW LAYER - RESIZE 50% TWICE - DROP SHADOW AND POSITION
OPEN GIFT 6 - PASTE AS A NEW LAYER - RESIZE - 50% TWICE - POSITION AND DROP SHADOW - MERGE TOGETHER
OPEN CAKE 5 AND PASTE AS A NEW LAYER - RESIZE 50% - DROP SHADOW AND POSITION
OPEN BANNER 3 - RESIZE 50% - DROP SHADOW AND POSITION
OPEN BEAR 5 - RESIZE 50% TWICE - DROP SHADOW AND POSITION
OPEN CONFETTI 3 AND PASTE AS A NEW LAYER ON THE BOTTOM - DUPLICATE - MIRROR - MERGE TOGETHER
MOVE THE FLOWER SO IT COVERS THE JOIN
OPEN FLOWER 2 - RESIZE 50% 3 TIMES AND POSITION - DROP SHADOW
OPEN CAKE 1 AND RESIZE 50% TWICE - DROP SHADOW AND POSITION
ADD COPYRIGHTS, YOUR MARK AND ANY TEXT
RESIZE ALL LAYERS - 75%
MERGE TOGETHER ALL LAYERS ABOVE THE HORIZONTAL RECTANGLE

THEN REPEAT WITH THE LAYERS BELOW THE RECTANGLE


YOU NOW SHOULD HAVE 4 LAYERS
TOP LAYERS
RECTANGLE
BOTTOM LAYERS BACKGROUND
ON TO THE ANIMATION:
HIDE TOP LAYER AND COPY MERGED AND PASTE INTO ANIMATION SHOP
DUPLICATE UNTIL YOU HAVE 15 FRAMES
OPEN ANIMATION 4 AND PASTE ONTO IMAGE
GO BACK TO PSP - COPY THE TOP LAYER AND PASTE INTO ANIMATION SHOP
DUPLICATE UNTIL YOU HAVE 15 FRAMES AND ADD ON TOP OF THE ANIMATION
VIEW ANIMATION AND SAVE AS A .GIF
IF YOU HAVE ANY QUESTIONS REGARDING THIS TUTORIAL PLS LEAVE A MESSAGE IN THE CHAT
BOX OR EMAIL ME AT clare_33@live.co.uk
THANKS AND ENJOY!
